PostgreSQL server is listening on 5432 by default.
Optionally you could choose to install pgAdmin III graphical administration utility.
sudo apt-get install pgadmin3
Add new user and database
After initial installation, a database and database user both named “postgres” are generated automatically. In the mean while, a Linux user called “postgres” is created as well.
You can add new users and databases in different ways.
1). Use PostgreSQL console
Add new Linux user “newuser”:
sudo adduser newuser
Switch to user “postgre”:
sudo su - postgres
You can connect to PostgreSQL terminal now.
psql
No need password here as database user name is same with Linux user name.
In terminal, set password to “postgre”:
\password postgres
Then add database user “newuser” and set password.
CREATEUSERnewuserWITHPASSWORD'password';
Create database “mydb” and set owner to “newuser”:
CREATEDATABASEmydbOWNERnewuser;
Don’t forget to grant privileges. Otherwise, “newuser” still can’t access “mydb”.
GRANTALLPRIVILEGESONDATABASEmydbtonewuser;
Use “\q” or ctrl+D to quit terminal.
2). Use shell commands
Create database user “newuser” and set him to superuser:
sudo -u postgres createuser --superuser newuser
Set password to “newuser” in terminal and quit terminal:
sudo -u postgres psql

\password dbuser

\q
Then create database in shell:
sudo -u postgres createdb -O newuser mydb
Connect to database
psql -U newuser -d mydb -h 127.0.0.1 -p 5432
If the current Linux user has same name with database user, you can omit the username in above command and you won’t be asked to provide password.
psql mydb
If there is a database named “newuser”, you can even omit database name.
psql
To restore database from sql file:
psql mydb < mydb.sql
Terminal commands
\h: Gives syntax help on the specified SQL command
\?: Shows help information about the backslash commands
\l: List the names, owners, and character set encodings of all the databases in the server
\c [database_name]: Establishes a new connection to a PostgreSQL server
\d: Show a list of all tables, views, and sequences
\d [table_name]: Show details of specified table
\du: Lists all database roles
\e: Open external editor
You also might need these packages if you don’t have them yet:
yum install make
yum install openssl-devel
1) Create Account Information
Become the root user.
su -l
Create a new nagios/icinga user account and give it a password.
/usr/sbin/useradd -m nagios
passwd nagios
OR
/usr/sbin/useradd -m icinga
passwd icinga
Create a new nagcmd/icinga-cmd group for allowing external commands to be submitted through the web interface. Add both the nagios/icinga user and the apache user to the group.
/usr/sbin/groupadd nagcmd
/usr/sbin/usermod -a -G nagcmd nagios
/usr/sbin/usermod -a -G nagcmd apache
OR
/usr/sbin/groupadd icinga-cmd
/usr/sbin/usermod -a -G icinga-cmd icinga
/usr/sbin/usermod -a -G icinga-cmd apache
2) Add RPMforge repo
Find the appropriate rpmforge-release package for your distribution at http://repoforge.org/use/. For example, you can install it like:
Edit the /etc/nagios/objects/contacts.cfg or /etc/icinga/objects/contacts.cfg config file with your favourite editor and change the email address associated with the icingaadmin contact definition to the address you’d like to use for receiving alerts.
5) Configure the Web Interface
Create a nagiosadmin/icingaadmin account for logging into the web interface. Remember the password you assign to this account - you’ll need it later.
Restart Apache to make the new settings take effect.
service httpd restart
6) Install the Nagios Plugins
For both Nagios and Icinga, you need to install Nagios plugins.
yum install nagios-plugins-all
7) Modify SELinux Settings
See if SELinux is in Enforcing mode.
getenforce
Put SELinux into Permissive mode.
setenforce 0
To make this change permanent, you’ll have to modify the settings in /etc/selinux/config and reboot.
8) Start Nagios/Icinga
Add Nagios/Icinga to the list of system services and have it automatically start when the system boots.
chkconfig --add nagios
chkconfig nagios on
OR
chkconfig --add icinga
chkconfig icinga on
Verify the sample Nagios/Icinga configuration files.
/usr/bin/nagios -v /etc/nagios/nagios.cfg
OR
/usr/bin/icinga -v /etc/icinga/icinga.cfg
If there are no errors, start Nagios.
service nagios start
OR
service icinga start
9) Login to the Web Interface
You should now be able to access the web interface at the URL below. You’ll be prompted for the username (nagiosadmin/icingaadmin) and password you specified earlier.
Click on the “Service Detail” navbar link to see details of what’s being monitored on your local machine. It will take a few minutes to check all the services associated with your machine, as the checks are spread out over time.
Monitor Remote Linux Host using Nagios/Icinga
1. Install and configure Nagios Plugins and NRPE on the remote host
1) Create nagios account
useradd nagios
passwd nagios
2) Install nagios-plugin and nrpe
yum install nrpe
yum install nagios-plugins-all
3) Edit nrpe.cfg to allow your nagios/icinga server and customise configuration
Edit nrpe configuration file:
vi /etc/nagios/nrpe.cfg
Find line allowed_hosts . it is a comma separated list. add your nagios server ip to the list
allowed_hosts=127.0.0.1,192.168.1.100
For customised configuration, please see nrpe.cfg.
4) IPTables
If you are running iptables or a firewall between the server and host, make sure that the host is allowing port 5666 from the server’s IP address.
5) Start nrpe service on system start up
chkconfig nrpe on
6) Start nrpe service
service nrpe start
2. Configure on the monitoring server to monitor remote host
1) Install nrpe
yum install nrpe
2) Check check_nrpe on the monitoring server
Verify whether monitoring server can talk to the remotehost. For example:
3) Create host and service definition for remotehost
Create a new configuration file /etc/nagios/objects/remotehost.cfg OR /etc/icinga/objects/remotehost.cfg to define the host and service definition for this particular remotehost.
For more details, please see scilinux2.cfg.
4) Restart the nagios/Icinga service
service nagios restart OR service Icinga restart
Examples of customising configuration
1. Check disk space on local host
# Define a service to check the disk space of the root partition# on the local machine.# Warning if < 25% free, critical if < 10% free space on partition.
define service{
use local-service ; Name of service template to use
host_name localhost
service_description Root Partition
check_command check_local_disk!25%!10%!/
}
2. Check Apache on local host
# Define a service to check HTTP on the local machine.
define service{
        use                   local-service         ; Name of service template to use
        host_name             localhost
        service_description   HTTP
        check_command         check_http
        }
3. Check how many Apache processes are running on local host
1) Add check_daemons in /etc/nagios/objects/commands.cfg OR /etc/icinga/objects/commands.cfg
2) Add service in /etc/nagios/objects/localhost.cfg OR /etc/icinga/objects/localhost.cfg
# Define a service to check the number of currently running Apache procs# on the local machine. Critical if the number is not in the range from 1 to 20
define service{
use local-service ; Name of service template to use
host_name localhost
service_description HTTP daemons
check_command check_daemons!1!20!httpd
}
4. Check PostgreSQL on remote host
1) Add check_nrpe in /etc/nagios/objects/commands.cfg OR /etc/icinga/objects/commands.cfg on monitoring server
To check remote host, check_nrpe is essential.
Note: Make sure check_nrpe is in /usr/lib64/nagios/plugins($USER1$)
Since I have started to write test scripts to perform automated tests in current work, I eventually learned how important testing is in software development.
Use the tests to help you write the code. Before writing actual code, write a test which verifies the expected set of data returned by a method. Let the test to guide your development. That is so called Test-driven development (TDD).
You can’t say the development is done until all tests passed. If the software exposed any problems, you’d better to modify the tests to include that test cases. So the code and the tests are refined over time. Ideally you probably should have tests to cover most if not all of the publicly exposed methods of the model (methods called from outside the model).
Even after the development, the testing is still important. If you later changes a method (maybe to add a new feature) and modify its behaviour then the test reveals that change and forces you to check your understanding of the method.
To sum up, the tests to some extent define our expectations of how the methods should behave - the contract that they fulfil with the caller of the method.
You can look at the tests as also being a tool to assist you in developing the code - verifying the correct behaviour of the model methods. They play significant and irreplaceable roles during the whole software development life cycle.
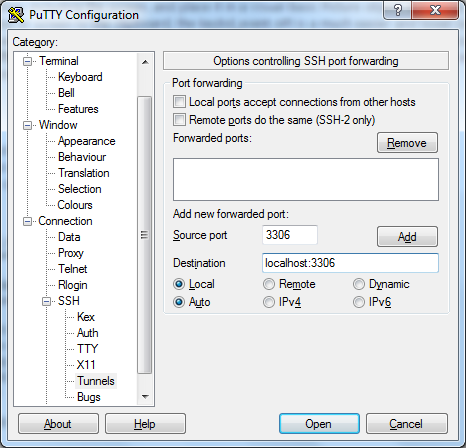
In order to access some services on remote server with PuTTY, you’ll need set up local ports to listen and forward to the server on corresponding ports. Take MySql(default port is 3306) as an example, you could connect to the remote MySql server on your local machine after setting up the tunnel.
In Putty Configuration, select Connection -> SSH -> Tunnels. Input “3306” for “Source port” field. PuTTY will listen on this port on your local machine. In “Destination” field, input server’s domain name or IP with port. For example, “localhost:3306” or “127.0.0.1:3306”. Then PuTTY could forward the connection to the server on the specified port.
Don’t forget to click “Add” button.
Last but not least, go back to Session tab and save the change to the session.
Web service is a software system designed to support interoperable machine-to-machine interaction over a network.
SOAP (Simple Object Access Protocol) and REST (Representational State Transfer) are two popular approaches to
implement web services. Before we compare the difference between them, let’s start from their definitions.
What’s SOAP
SOAP is a protocol specification for exchanging structured information in the implementation of Web Services in computer networks.
It relies on Extensible Markup Language (XML) for its message format, and usually relies on other Application Layer protocols,
most notably Remote Procedure Call (RPC) and Hypertext Transfer Protocol (HTTP), for message negotiation and transmission.
SOAP can form the foundation layer of a web services protocol stack, providing a basic messaging framework upon which web services can be built.
What’s REST
REST is a style of software architecture for distributed hypermedia systems such as the World Wide Web.
A RESTful web service (also called a RESTful web API) is a simple web service implemented using HTTP and the principles of REST.
It is a collection of resources, with three defined aspects:
the base URI for the web service, such as http://example.com/resources/
the Internet media type of the data supported by the web service. This is often JSON, XML or YAML but can be any other valid Internet media type.
the set of operations supported by the web service using HTTP methods (e.g., POST, GET, PUT or DELETE).
SOAP vs REST
Here we go. Let’s see their difference now. Unlike SOAP-based web services, there is no “official” standard for RESTful web services.
This is because according to the definitions, REST is an architecture, unlike SOAP, which is a protocol.
REST is an architectural style of large-scale networked software that takes advantage of the technologies and protocols of the World Wide Web.
REST describes how distributed data objects, or resources, can be defined and addressed, stressing the easy exchange of information and scalability.
Even though REST is not a standard, a RESTful implementation such as the Web can use standards like HTTP, URI, XML, etc.

Twitter · Facebook
Linkedin · Delicious
GitHub · Douban · Xbox Live